ROAD HANDLING
The shortest distance between two points is a straight line. Time is made on the straights. Given these premises, you now want to make all roads as straight as possible. Certainly, the turns are what makes the road fun, but the real challenge is to drive a line through a curve or series of curves that is as straight, and therefore as fast, as possible. It is time to redefine the road.
Familiarity with your car and practice with your peripheral vision are extremely important now. You need a feel of exactly where your tires are and where the sides of your car are while you are concentrating on the road in the distance. You can practice by setting up some cones with sticks extending from the point. Douse your tires with water, and then drive past them at a reasonable speed while looking into the distance. Get out and see how close your wet tire tracks were to the cones. Try it while turning past the cones, too. Know the limits of your peripheral vision, because in redefining the road we are getting rid of any excess margin. This is also why familiarity with scrubbing is important. You need a feel for what the minimum amount of pavement you need is.
High speed driving is not reactive. It is active. You are not trying to react to where you are in the turn, but you are actively planning what you will be doing ahead. This is where looking through the turns becomes critical. Looking through the turns not only helps you steer smoothly, it also helps you plan your driving line.
Let's redefine the road. Remember the yellow lines that divide you from oncoming traffic? Good. Don't forget them. Remember the solid white line which marks the boundary between the "road" and the paved shoulder? Forget it. (If you are on a multiple lane road, don't cross over into other people's lanes unless you are changing lanes. Basically, use your safe judgement.) You need to see the road as a slab of pavement, not a lane in which you stay as far away as possible from the lines on each side of you. With this view we are going to stop driving in lanes and start driving on "lines". Simply put, the line is the path over which you direct the center of your car as you drive down the road. This brings us back to the shortest distance between two points...
Straightening a single curve is easy. Enter the curve at the outside of the usable pavement. Steer towards the "apex" of the turn. Technically the "apex" is top of the curve. The curve of what you ask? You have the choice of either the curve in the road or the curve in your line. Generally speaking, the apex is the area where your line is closest to the inner side of the usable pavement. Your car should be at its most stable attitude while in the apex area. (Your car doesn't become stable by being in the apex. You must use great skill to make it stable. I will discuss how you can control your car's attitude later. For now I want to discuss where you are going as opposed to how you are going.) Finally, exit the curve at the outside of the usable pavement.
Sound simple? Let me go over it again with a few more details on what is really going on. When you enter the turn you will have already chosen where the apex you will use is and where you will turn in to make this apex. These choices will be made upon the curve you can actually see, or if your know the road very well, based on the curve you know. Do not guess what the curve you can't see is like. Your guess could hurt you as well as others on the road. (Also remember that cyclists, pedestrians, pets and other animals may be in the road ahead.) The turn-in point is where your line starts to turn as opposed to where the pavement turns. These don't always correspond with each other. Remember, smooth. The turn-in point is where you start turning the steering wheel. Do not point the car straight towards the apex. Turn so that your line will make the smoothest arc which will get your car to the apex so that your car is pointing in the correct direction to travel through the curve. The following drawing illustrates an incorrect and a correct line from the beginning of a curve to the apex.
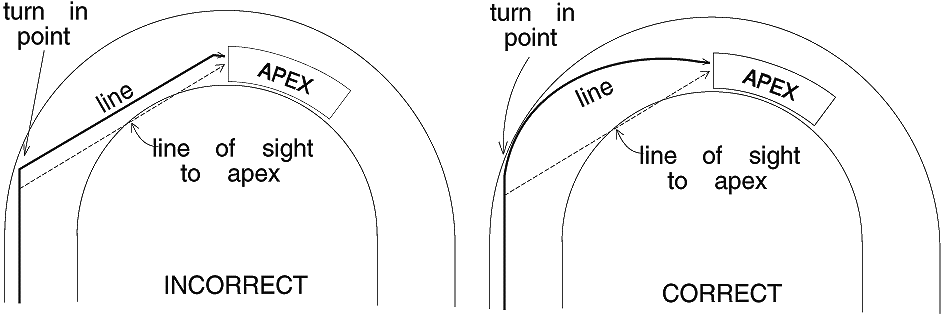
In the incorrect example the driver makes a sharp turn and drives a straight line towards the apex and then makes another sharp turn to set the car up for the proper apex. If the driver succeeds, he or she is driving much too slow for the curve. If the driver is driving at the fastest speed for the turn, he or she lost control of the car at the first sharp turn. When your car is at the limit of adhesion it cannot make a sharp turn. I will explain why in a later part.*
*AN INTERRUPTION FROM SOMEONE WHO HAS LOST HIS WAY
When I started writing this series I envisioned creating a simple "How to..." guide of simple driving techniques in about four parts. It seems that I am getting carried away and therefore will take much longer to explain these techniques since I am including an explanation of the physical dynamics involved. And since you will understand the dynamics, I might as well include more sophisticated techniques which should cover just about everything you need to know about driving on paved roads whether in a Type 102 F1 Lotus or a VW Bug.
BACK TO CURVES...
In the correct example, the driver steers into a gentle arc which leads to a proper line for the apex and, therefore, the exit. The gentle arc can be driven at a much faster speed than the sharp turns in the incorrect example. Since most cars don't have the torque of a F1 engine, a higher average speed can be achieved in the gentle arc than in the two sharp turns with the straight in between. This higher average speed means a faster turn.
The trick is in choosing the best area on the curve for your apex. You want to choose an apex which allows you to drive the straightest curve. The apex is generally one-half to two-thirds of the way around the corner. Unfortunately it is easier to tell if you choose a wrong apex than if you choose a correct apex. If your apex is too early, you will find that you must add steering input to keep from running off of the road. If your apex is too late, you will find that you have too much road to spare at the exit. While this is not as terrible as an early apex since you're still on the road, you didn't take full advantage of all of the available pavement to make the curve straight and therefore as fast as possible. With practice you'll get a feel of how to choose an apex.
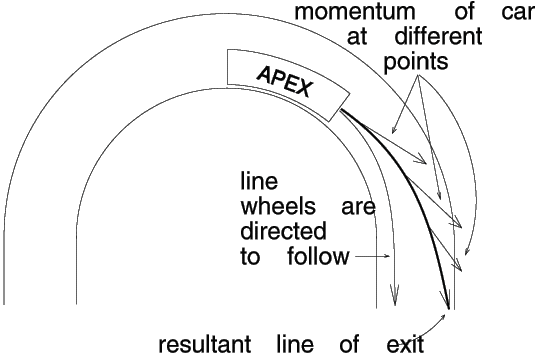 From the end of the apex to the end of the turn
is your exit. The exit is where you smoothly straighten
the car and smoothly accelerate. You can't accelerate
during the apex because you're in a single radius curve at
the limit, and to go faster you have to straighten out
(Again, I'll explain the dynamics of the turning forces
later.). Therefore, all acceleration is done during the exit.
During a good exit you'll experience something known as drift. Drift is the condition when the accelerating momentum
of the car causes all four tires to scrub, increasing the pavement required for the exit. To take advantage of the extra
friction while scrubbing: exit the apex, accelerate while straightening the steering wheel at a rate which would cause the
car to exit the curve well within the available pavement. The acceleration will cause the car to drift further out than the
steering input, which if done correctly will put your car at the edge of the usable pavement at the end of the curve. The
key is speed, so accelerate smoothly as fast as possible and straighten the car in such a manner that the scrub angle
lands you at the appropriate exit point. The following illustration shows the components of motion of a drift.
From the end of the apex to the end of the turn
is your exit. The exit is where you smoothly straighten
the car and smoothly accelerate. You can't accelerate
during the apex because you're in a single radius curve at
the limit, and to go faster you have to straighten out
(Again, I'll explain the dynamics of the turning forces
later.). Therefore, all acceleration is done during the exit.
During a good exit you'll experience something known as drift. Drift is the condition when the accelerating momentum
of the car causes all four tires to scrub, increasing the pavement required for the exit. To take advantage of the extra
friction while scrubbing: exit the apex, accelerate while straightening the steering wheel at a rate which would cause the
car to exit the curve well within the available pavement. The acceleration will cause the car to drift further out than the
steering input, which if done correctly will put your car at the edge of the usable pavement at the end of the curve. The
key is speed, so accelerate smoothly as fast as possible and straighten the car in such a manner that the scrub angle
lands you at the appropriate exit point. The following illustration shows the components of motion of a drift.
Next time - more curves. Until then happy flying.
FOOTNOTE ON STEERING
Some of you who have been watching F1 and CART races where cameras are mounted inside cockpits may have noticed that they don't keep their hands in the nine-three position. Keep in mind that the steering on these cars is very quick with less than two turns lock to lock (probably closer to one turn lock to lock.) Almost all street cars require close to four turns lock to lock. The TR6 system many TVRs use requires 3.5 turns. You will notice that the racers will slide their hands around shuffle steer style on the tighter turns. They don't let their arms twist too much.
P.S. In reference to a tech article by Mark Nast which appeared in Issue 6, 1989 I would like to make two comments. In terms of adjustable spring seats on gas shocks, the trick is to obtain shorter than stock springs to use on the shocks. The spring seat can be raised to obtain stock height, or lowered to the desired ride height. Cutting coils off of the stock springs will increase the spring rate. The other option is custom made springs. Carrera springs are custom made for spring rate, inner diameter, and free length and have a lifetime guarantee to be within 4% of the original rate and free length if not damaged. They can be obtained to the buyers specs through Dave Bean Engineering at 805-962-8126 for $70 dollars a piece.
My other comment concerns the statement that "TVR bodies are unstressed...extra structural support is not needed to make a roadster." This is not entirely true. On a TVR the body is not designed as a structural member of the chassis. Therefore the chassis of the 3000S is the same as the other Ms. However, the body bears a great deal of stress primarily at speed as an aerodynamic member as well as support for driver, passenger, fuel tank, seats, glass, etc. On a closed head TVR the roof supports the front windscreen and bears compressive forces around the doorways where there is no side structural support. With the closed head removed, as in the 3000S, the body would like to fold up around the seat bottoms since passengers provide a force down and the outriggers appear as forces in the upward direction. The windscreen has also lost its support. Stiffening of the U in the door frames and the upside-down U in the front cowl and behind the seats is required to provide appropriate structural integrity. This is evident in the 3000S in the redesigned dash required to accommodate the windscreen support structure. As for the point regarding vehicle weight, I do not know how this affects the weight of the S versus the M.
 Flying Title Page